Saturday 23 August 2014

12. (E) Second Cement Layer (waterproof, coloured render)

1. In a wheel barrow mix sand, cement, black oxide (1/3 bag), multibond (1/3 bottle). You will mix up three wheel barrow loads in total. 

2. Smooth onto the surface of the oven, working with the trowel for a smoth and bonded surface. 

3. Leave to dry. Cover with tarpaulin if it is going to rain. 


11. (D) First Cement Layer (render)


1. Cover the entire pizza oven (including chimney if you are shaping it) with chicken wire.

2. Mix up cement sand/cement 5:1and apply to the surface. Push it into the chicken wire so it is a solid thick layer. You can build this up to form a shape. 

3. Smooth with a trowel. 

4. Leave at least 24 hours before starting the next layer. Cover with tarpaulin if it rains.  


NB: This can be reasonably rough as your final layer will be nice and smooth.

10. (C) Vermiculite and Cement Layer (insulation)


 1. In a wheel barrow mix your vermiculite with cement in a ratio of 5:1. (Make sure you wear a dust mask). You will need to make three seperate wheel barrow loads so it doesn’t set before you can use it. 

2. Apply by cupping the mixture in your hand and applying to the surface in a thick layer (20mm). Work with a trowel. 

3. Dry at least overnight.Cover with tarpaulin if it rains.  


NB: This layer is quite crumbly so it 
needs a bit of work  with the trowel to 
get it to bond. You can take this layer
up the chimney if you like. We placed 
it to the top of our chimney 


9. (B) Adobe Layer

1. In a wheel barrow mix adobe by combining 5L clay with the previous recipe for refractory mortar (70% clay soil, 20% sand, 10% cement).

2. Smooth this in an even layer over the entire pizza oven. This gives a nice uniform surface to attach the nest layer to and begins to provide some insulation. Work with a trowel for even and smooth coverage. 

3. Dry this layer for at least 24 hours. Use tarpaulin to protect from rain. Again lighting a small fire in the oven after a good period of drying time will help rid excess moisture. 


NB: This layer may crack while drying due to the high amounts of clay. It will not make a difference to the final structure. 


8. (A) Red Clay Brick, Adobe Mortar and Refractory Mortar

1. Using a mallet and cold chisel split a number of bricks in half. These will be used for the small arch and the brick dome.  

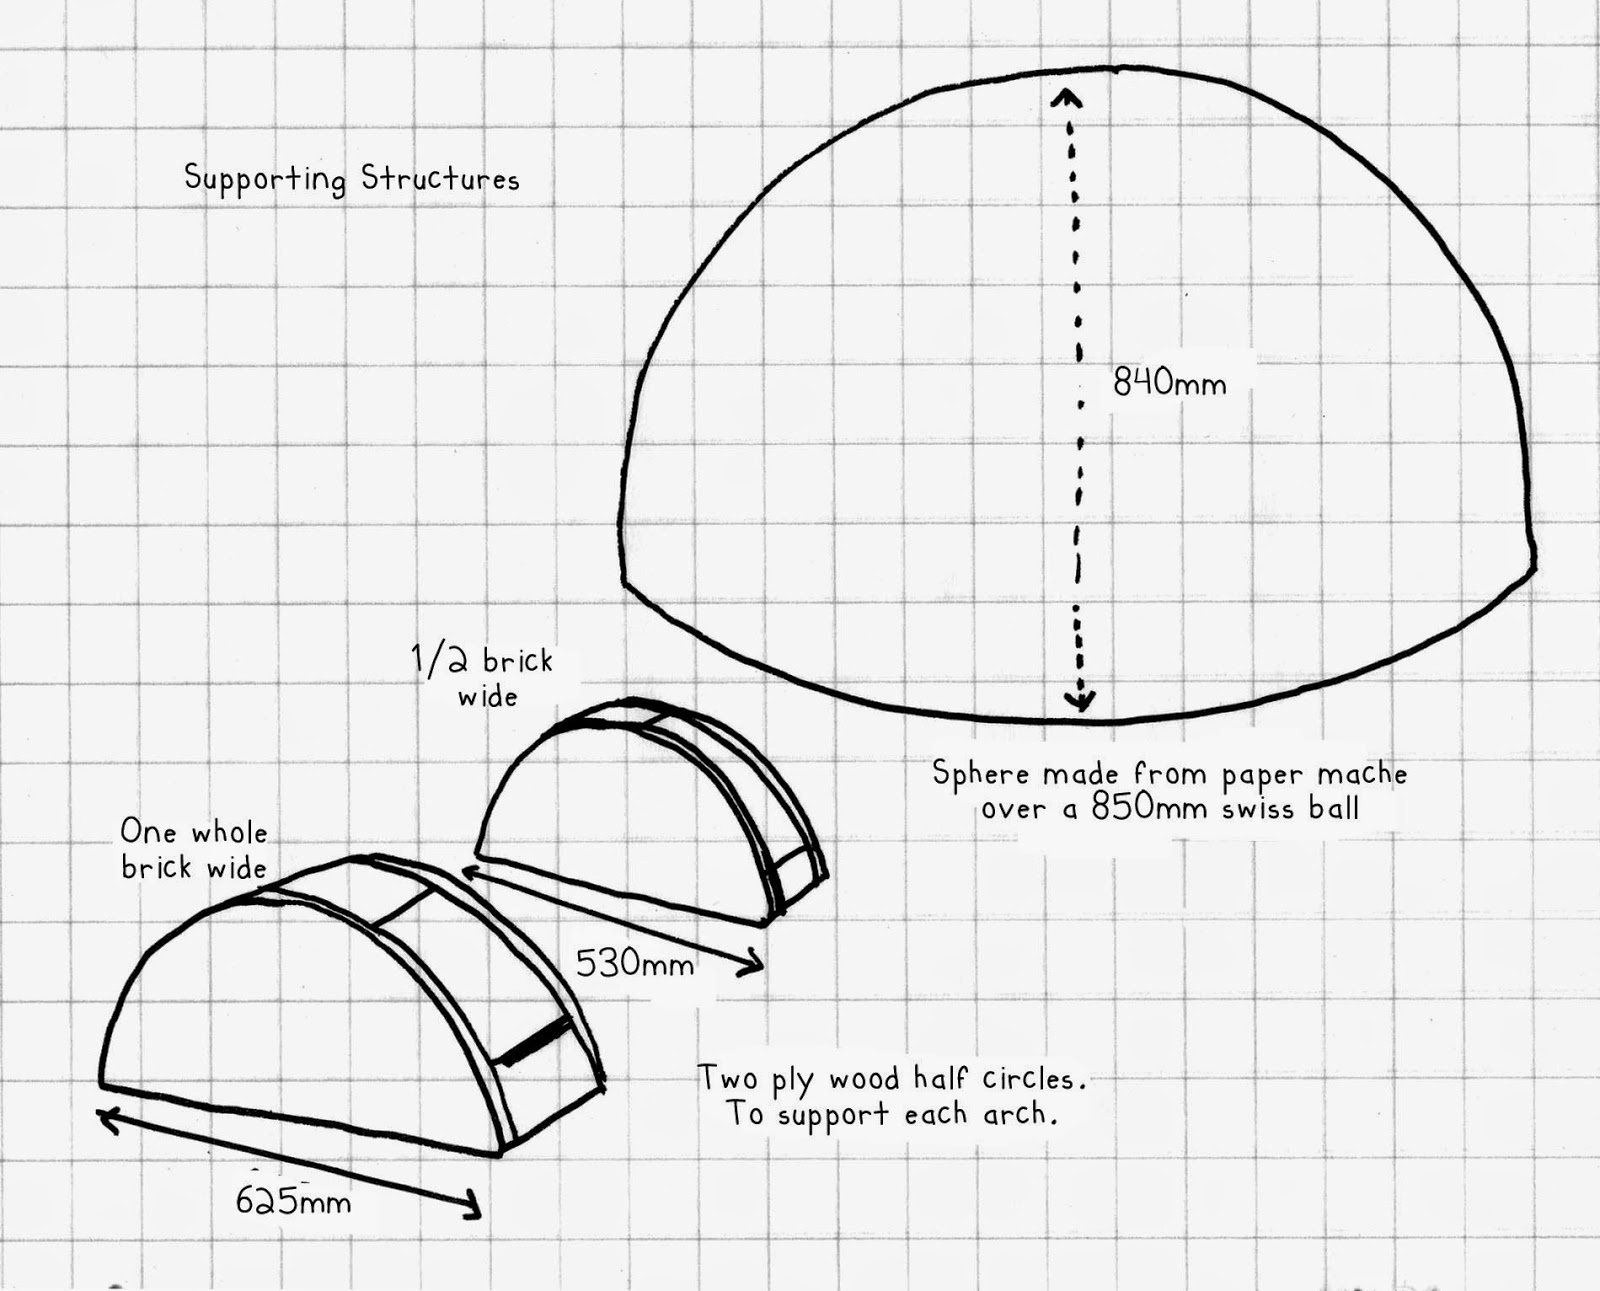
2. Mark out with chalk the base structure (see fig.1) and put in place the supporting structures 
(see fig. 3) i.e. ply wood arches, paper mache dome). 


3. In a wheelbarrow mix adobe mortar: 70% clay soil, 20% sand, 10% cement. These are fairly loose percentages. You could use less soil (50%) and more sand and cement if you feel so inclined.

4. Place 1/2 bricks around the outside of the paper mache dome. The inside edges of the bricks need to touch each other (i.e. do not leave a gap between the bricks). Using you fingers, poke the adobe mix in between the bricks. Complete the full dome this way. 

5. In the same way make two arches around the ply wood structures using 1/2 bricks for the small arch and whole bricks for the larger outside arch. At the top of the larger arch leave a gap where you can sit the chimney.  

6. Place chicken wire around the chimney and use the refractory adobe (with higher ratios of cement and sand and a little gravel) to secure it in place. 


7. Remove the paper mache dome and ply wood supports. The structure should be able to hold itself. 

8. This layer needs to dry out for a couple of days. Be sure to keep it dry by covering it if it rains. You can light a small fire in the oven the next morning to help dry out the mortar completely. 

Wednesday 20 August 2014

7. Supporting Structures (fig. 3)


6. Pizza Oven Cross Section (fig. 2)


A. Red Clay Brick, adobe refractory mortar (70% clay soil, 20% sand, 10% cement).

B. Adobe (5L clay added to 70% clay soil, 20% sand, 10% cement)

C. Vermiculite and Cement Insulation. (vermiculite/cement 5:1)

D. Rough Cast Cement (sand/cement 5:1)


E. Cement/Plaster, black oxide (500g) and waterproofing agent. (500ml)